In our previous post about computer vision, we showed our pipeline to solve a specific problem, and it involved some steps inside Blender and others on OpenCV. Also, I mentioned that it was not something straightforward to go from one to the other. Here we will describe how we transposed camera and objects from a scene from Blender to OpenCV.
Coordinate Systems
Blender has five documented coordinate orientations, but the two important here are Global and View orientations. OpenCV’s documentation describes both here.
| Blender Global | Blender View | OpenCV Global | OpenCV View | |
|---|---|---|---|---|
| X | to the view | left to right | left to right | left to right |
| Y | left to right | down to up | up to down | up to down |
| Z | down to up | to the view | to the view | from the view |
The transformation from Blender to OpenCV
To transform from the Blender View orientation to the OpenCV View orientation, we need to keep X while inverting Y and Z signals. But there is a trick here: if we want to describe an object in front of the camera, we will need to invert X’s signal too, so we will use (X, -Y, -Z) if the object is the camera, but for another type, its (-X, -Y, -Z).
Using the transformation
First, we can’t use Euler angles because of the same mathematical principle that causes “Gimbal Lock” (read here). So we will use the rotation-translation matrix.
Among other representations like quaternions, we choose to use the
rotation-translation matrix to represent the pose of the object/camera. It is
defined by a rotation matrix R and a translation vector T, both
concatenated in a form of a [R|T] matrix.
For cameras, if the [R|T] matrix is further multiplied by the intrinsic
parameters, we call it a projection matrix, so it feels very convenient and
compact form to organize the information.
Before we jump into the implementation, as a reference, we would like to point this excellent answer from the StackOverflow community. Despite we didn’t need to do much to use that code to transpose the camera, we would like to describe the steps used, along with our small modification to transpose objects that are not a camera.
- To satisfy both camera and other objects, the transformation matrix from
Blender to OpenCV is modified accordinly:
R_BlenderView_to_OpenCVView = np.diag([1 if isCamera else -1,-1,-1]) - From Blender’s API, we can get the world transformation matrix for a given
object calling
bpy.types.Object.matrix_world(), then we can usemathutils.Matrix.decompose()to decompose it in terms of a locationVectorand rotationQuaternion.location, rotation = obj.matrix_world.decompose()[0:2] - Transform from Blender Global orientation to Blender View orientation by
transposing:
R_BlenderView = rotation.to_matrix().transposed() - Apply Blender View rotation to the location:
T_BlenderView = -1.0 * R_BlenderView @ location - Transform from Blender View orientation to OpenCV View orientation:
R_OpenCV = R_BlenderView_to_OpenCVView @ R_BlenderView
T_OpenCV = R_BlenderView_to_OpenCVView @ T_BlenderView
Finally, all steps together:
import bpy
from mathutils import Matrix, Vector
import numpy as np
# From https://blender.stackexchange.com/a/120063/116769
# copy get_sensor_size(), get_sensor_fit(), get_calibration_matrix_K_from_blender()
# Our contribution below
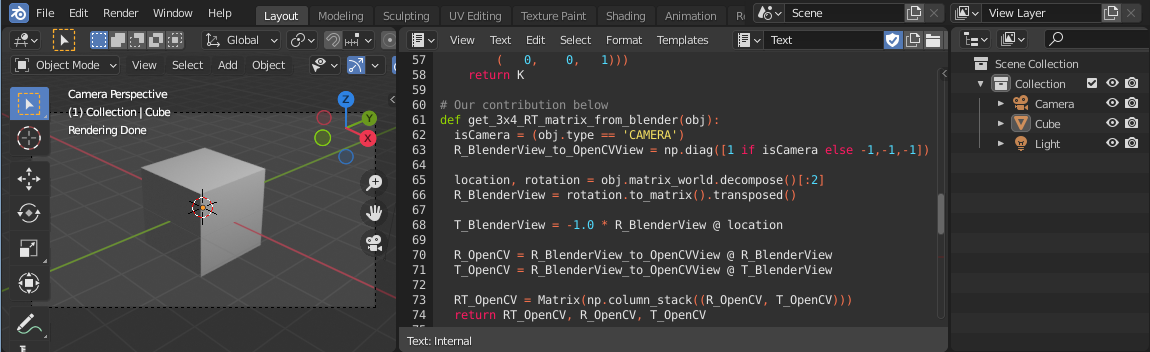
def get_3x4_RT_matrix_from_blender(obj):
isCamera = (obj.type == 'CAMERA')
R_BlenderView_to_OpenCVView = np.diag([1 if isCamera else -1,-1,-1])
location, rotation = obj.matrix_world.decompose()[:2]
R_BlenderView = rotation.to_matrix().transposed()
T_BlenderView = -1.0 * R_BlenderView @ location
R_OpenCV = R_BlenderView_to_OpenCVView @ R_BlenderView
T_OpenCV = R_BlenderView_to_OpenCVView @ T_BlenderView
RT_OpenCV = Matrix(np.column_stack((R_OpenCV, T_OpenCV)))
return RT_OpenCV, R_OpenCV, T_OpenCV
def get_3x4_P_matrix_from_blender(cam):
K = get_calibration_matrix_K_from_blender(cam.data)
RT = get_3x4_RT_matrix_from_blender(cam)[0]
return K @ RT
def export_camera_to_opencv(cam_name):
cam = bpy.data.objects[cam_name]
P = get_3x4_P_matrix_from_blender(cam)
nP = np.matrix(P)
path = bpy.path.abspath("//")
filename = cam_name + ".txt"
file = path + filename
np.savetxt(file, nP)
print(f"Saved to: \"{file}\".")
def export_object_location_to_opencv(obj_name):
obj = bpy.data.objects[obj_name]
nT = get_3x4_RT_matrix_from_blender(obj)[2]
path = bpy.path.abspath("//")
file = f"{path}{obj.name}.txt"
np.savetxt(file, nT)
print(f"Saved to: \"{file}\".")
def main():
export_camera_to_opencv('Camera')
export_object_location_to_opencv('Cube')
if __name__ == "__main__":
main();
On the OpenCV’s side
import numpy as np
import cv2 as cv
from scipy.spatial.transform import Rotation as Rot
from matplotlib import pyplot as plt

projectionMatrix = np.loadtxt('Camera.txt')
intrinsic, rotationMatrix, homogeneousTranslationVector =
    cv.decomposeProjectionMatrix(projectionMatrix)[:3]
camT = -cv.convertPointsFromHomogeneous(homogeneousTranslationVector.T)
camR = Rot.from_matrix(rotationMatrix)
tvec = camR.apply(camT.ravel())
rvec = camR.as_rotvec()

objectPoint = np.loadtxt('Cube.txt')

projectedObjectPoint = cv.projectPoints(
    objectPoints=objectPoint,
    rvec=rvec,
    tvec=tvec,
    cameraMatrix=intrinsic,
    distCoeffs=None,
)[0]

# img = cv.imread(IMAGE_NAME)
img = np.zeros((1080, 1920, 3), np.uint8)
projectedObjectPoint = np.round(projectedObjectPoint.squeeze()).astype(int)
img = cv.circle(
    img,
    center=projectedObjectPoint,
    radius=10,
    color=(255,0,0),
    thickness=2
)
plt.imshow(img)
plt.show()
Note: the code above uses the Cube and the Camera was adapted
considering the default Startup Scene,
meaning it should be easy to test with no fancy setups. Also, to be able to see
the output from a Python’s print(), start Blender from a terminal.
Conclusion
While OpenCV and Blender alone are very powerful tools, the possibilities can be extrapolated if used together or along with other tools.
In that sense, in this post, we show a way to deal with the most common difference when transposing objects between different 3D software - their coordinate systems.
Finally, by seeing how easy is to write Python code inside Blender using its great API, and how simple it can be to integrate it with other tools, we can imagine countless solutions benefiting from this kind of combination of tools!